Start Installing xAgent
This page is for administrators installing xAgent for the first time. It starts with the installer command and walks through the system setup that opens automatically when you first visit the Web console. For server preparation and self-hosting boundaries, continue to Self-host an AI Agent.
Match the Version and Setup Screen
The installer reads the public release catalog. As of 2026-10-19, the public release is v0.1.0. Most screenshots are from v0.0.5.beta; they preserve field explanations, not current button locations.
The setup screen in the 2026-10-01 source uses the following sequence. If you installed a public binary, follow the steps actually displayed; newer source behavior does not describe every earlier release.
| Current Source Order | What to Complete | Relation to the Guidance Below |
|---|---|---|
| Data directory | Choose a persistent absolute path; if prompted, restart before returning | Step 4 |
| Database | Choose SQLite or PostgreSQL; configure and test PostgreSQL; restart if prompted | No separate step in the earlier screenshots |
| Administrator | Create the first administrator and confirm the password | Step 5 |
| Default model | Choose a conversational Provider, test, and save it | Step 6 |
| Finish setup | Check the directory, database, administrator, and model; select a runtime source if needed | Step 9; runtime validation remains in Steps 7 and 8 |
Runtime Assets and ProcessSandbox still require execution-environment validation. Current source no longer gives them two separate setup-wizard steps. Do not reset a working installation just to reproduce the earlier screenshots.
Before You Start
Confirm that:
Operating system recommendation: xAgent currently supports Linux (AMD64/ARM64) and macOS. For server deployments that need stable long-running operation, automatic startup, and minimal downtime, Debian Linux is recommended, with systemd managing the service. macOS is xAgent's primary development environment, so development, testing, and personal deployment support are also strong. Windows is not recommended for deployment for now because its current sandbox support is not sufficient to provide safe and controllable execution of xAgent-managed scripts equivalent to Linux or macOS.
- Linux uses AMD64 or ARM64 and the current account has
rootorsudoaccess. macOS also supports a user-level installation. - The host can reach
downloads.xagent.xiagaogao.com, your model API, and any external systems you plan to connect later. - There is enough disk space for versioned binaries, runtime data, workspace files, and Runtime Assets.
- If the service will be public, plan HTTPS through a reverse proxy, firewall rules, and access control. xAgent does not terminate TLS itself.
- If this is an upgrade, back up configuration, databases, workspaces, Memory, Skills, Tool packages, and installed AgentPlugin configuration and data first.
Step 1: Run the Installer
Linux and macOS use the same installer command:
curl -fsSL https://downloads.xagent.xiagaogao.com/scripts/install.sh | bash
The installer detects the operating system and CPU architecture, downloads and verifies the matching package, installs or upgrades xAgent, and creates, enables, and starts the xagent-server systemd service on Linux.
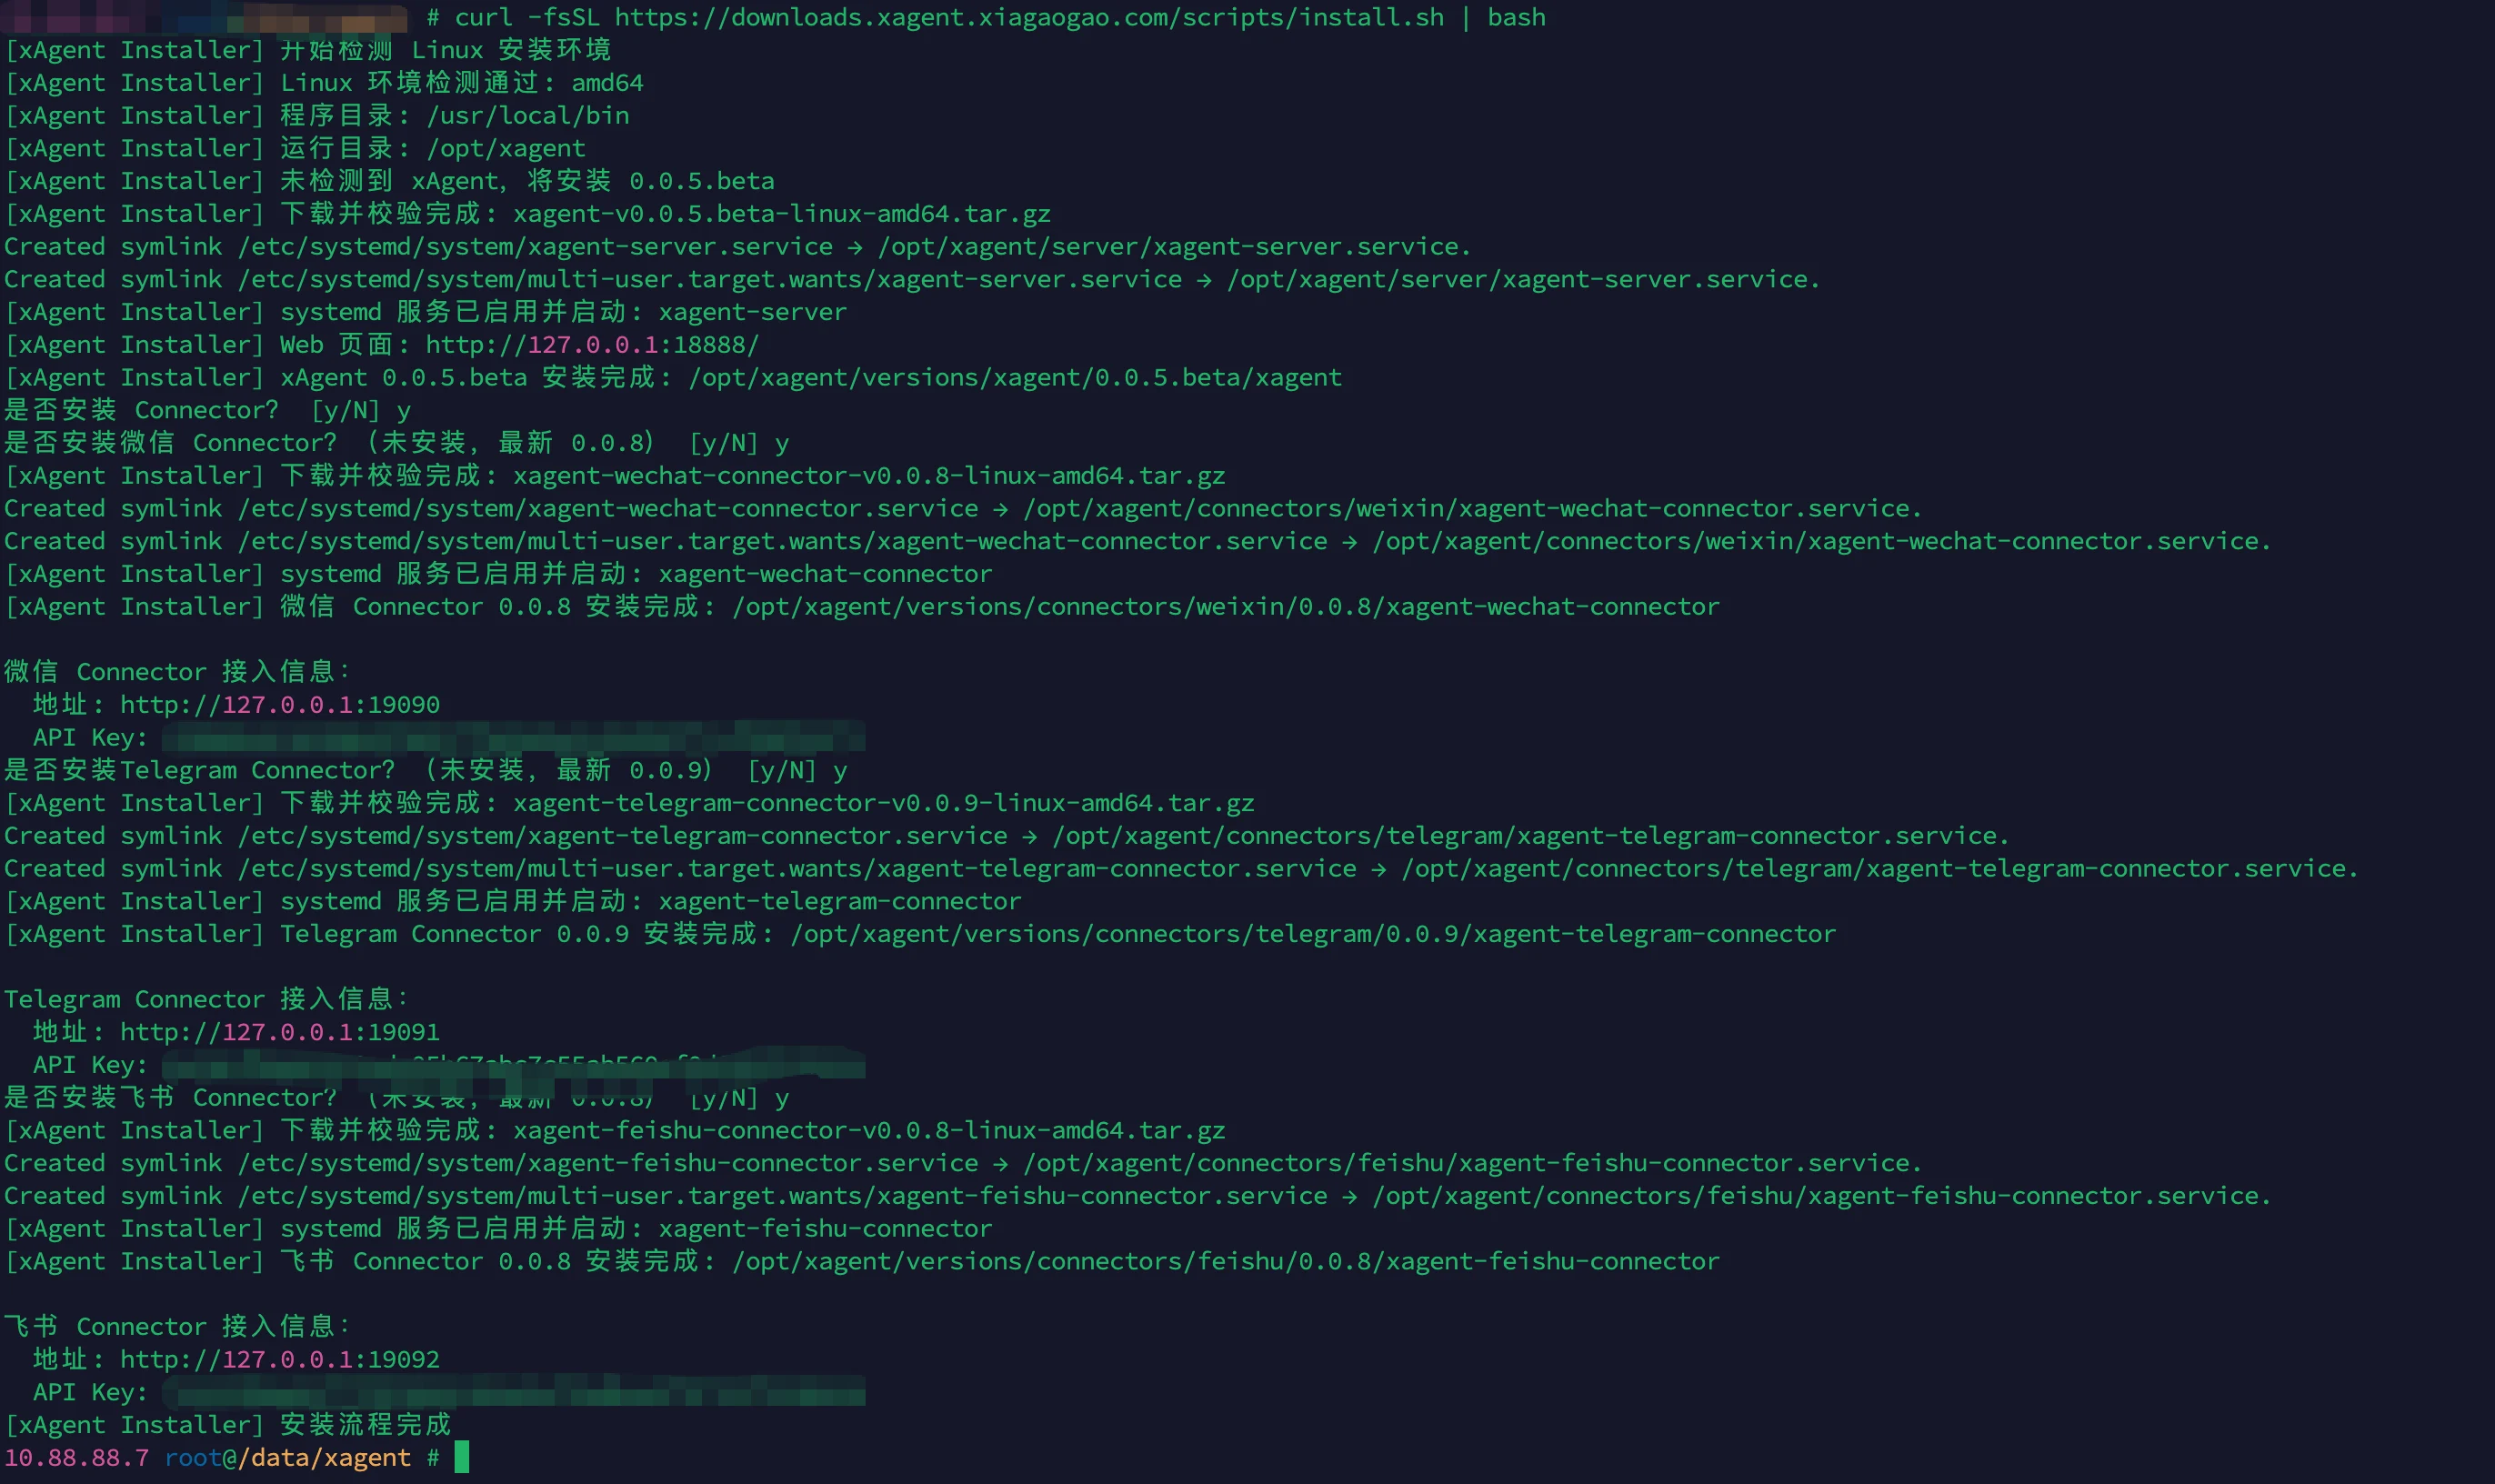
This image shows an earlier release. The current installer installs xAgent first and then optionally installs AgentPlugins (WeChat, Telegram, Feishu, Database, SSH, and DingTalk). It downloads and verifies selected packages, registers services, and prints their addresses and API Keys. Never publish API Keys in documentation, screenshots, or public logs.
If you only need the Web console, answer N when prompted for AgentPlugins. For unattended installation, skip them as shown below. To select plugins, use --agent-plugins database,ssh (values: all, weixin, telegram, feishu, database, ssh, dingtalk):
curl -fsSL https://downloads.xagent.xiagaogao.com/scripts/install.sh \
  | bash -s -- --yes --no-agent-plugins
Step 2: Verify the Installation
After the installer exits, confirm the version:
xagent version
The public target at this review date is 0.1.0; compare the actual installed output with the release catalog on the day you install. The installer command is unchanged and reads the current release catalog. On Linux, also check the service:
sudo systemctl status xagent-server
journalctl -u xagent-server -f
When upgrading a legacy Connector installation, use the full installer or published upgrade.sh so official plugin binaries, services, configuration, and state migrate together; replacing only the Server binary is insufficient. Custom legacy components require separate adaptation. Verify that any Enterprise license allows 0.1.0 before upgrading.
After a successful start, the default Web address is:
http://server-address:18888/
Do not expose port 18888 directly to the public internet. Use Nginx, Caddy, or another reverse proxy for HTTPS and restrict the allowed sources.
Step 3: Open System Setup
After the service starts, the first visit to the Web address automatically opens the System setup page. You do not need to find another settings entry. Earlier wizard screens show the following sequence. Current source adds database configuration and consolidates runtime-resource controls, as described above:
- Configure the data directory.
- Initialize the administrator.
- Set the default model.
- Prepare Runtime Assets.
- Check runtime components.
- Finish setup and enter the workspace.
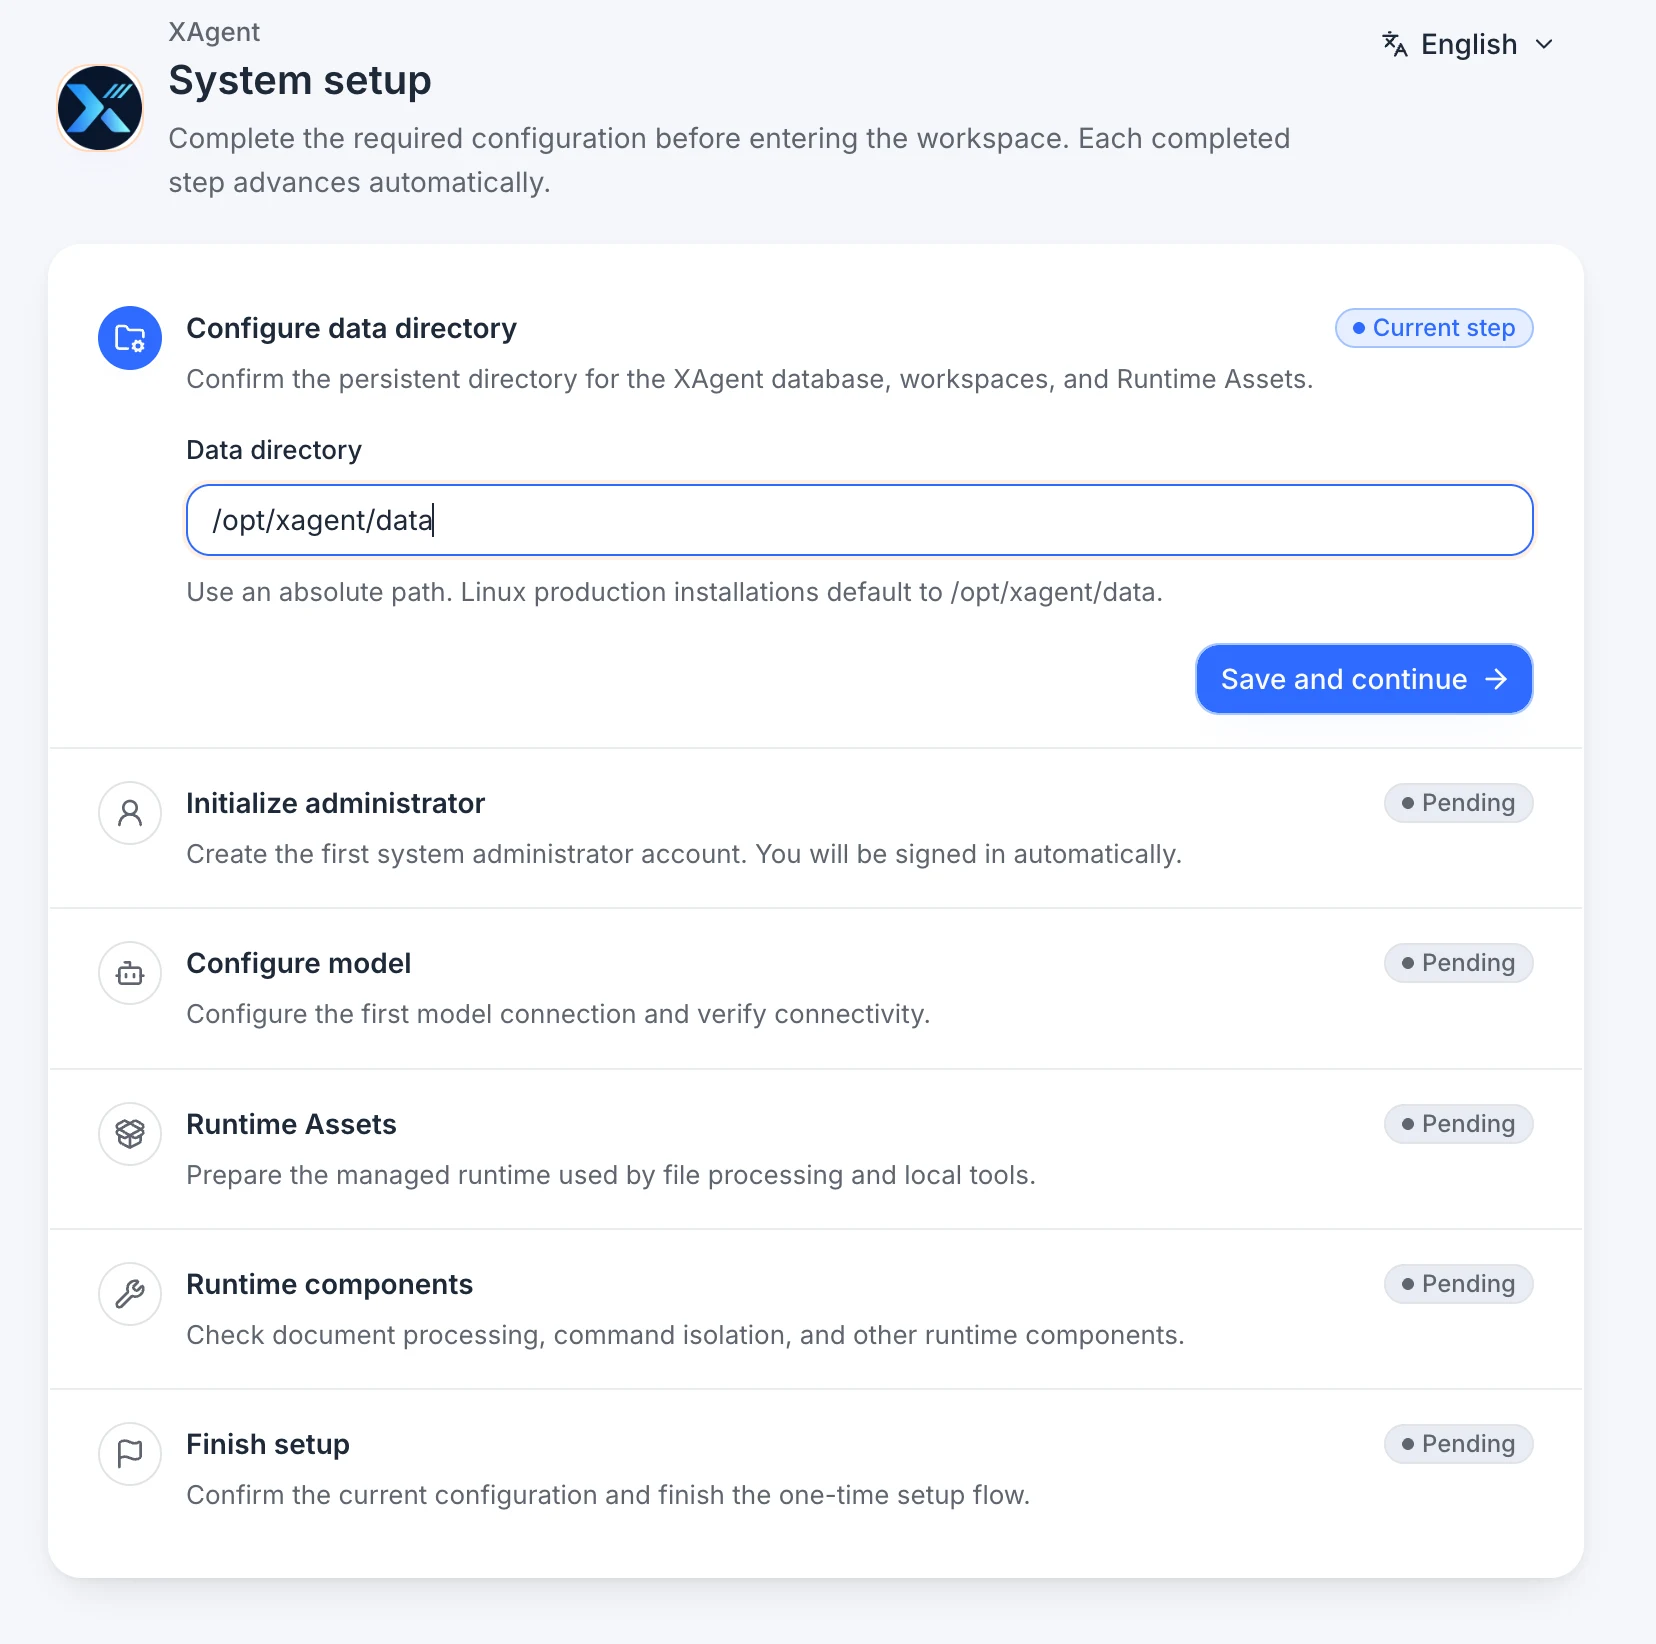
Step 4: Configure the Data Directory
The data directory stores the xAgent database, workspaces, and Runtime Assets. Linux production installations default to:
/opt/xagent/data
Use an absolute path and make sure the xAgent runtime account can read and write it. This directory must be persistent. Do not place it in a temporary directory, a container temporary layer, or a location that is cleaned automatically.
Earlier versions use Save and continue to proceed to administrator initialization. Current source first inserts database configuration; if a restart is requested, follow the prompt and reopen the page.
Step 5: Initialize the Administrator
Create the first administrator login name and password. This account is used to sign in, configure models, manage users, set approval policies, and maintain AgentPlugin Connectors.
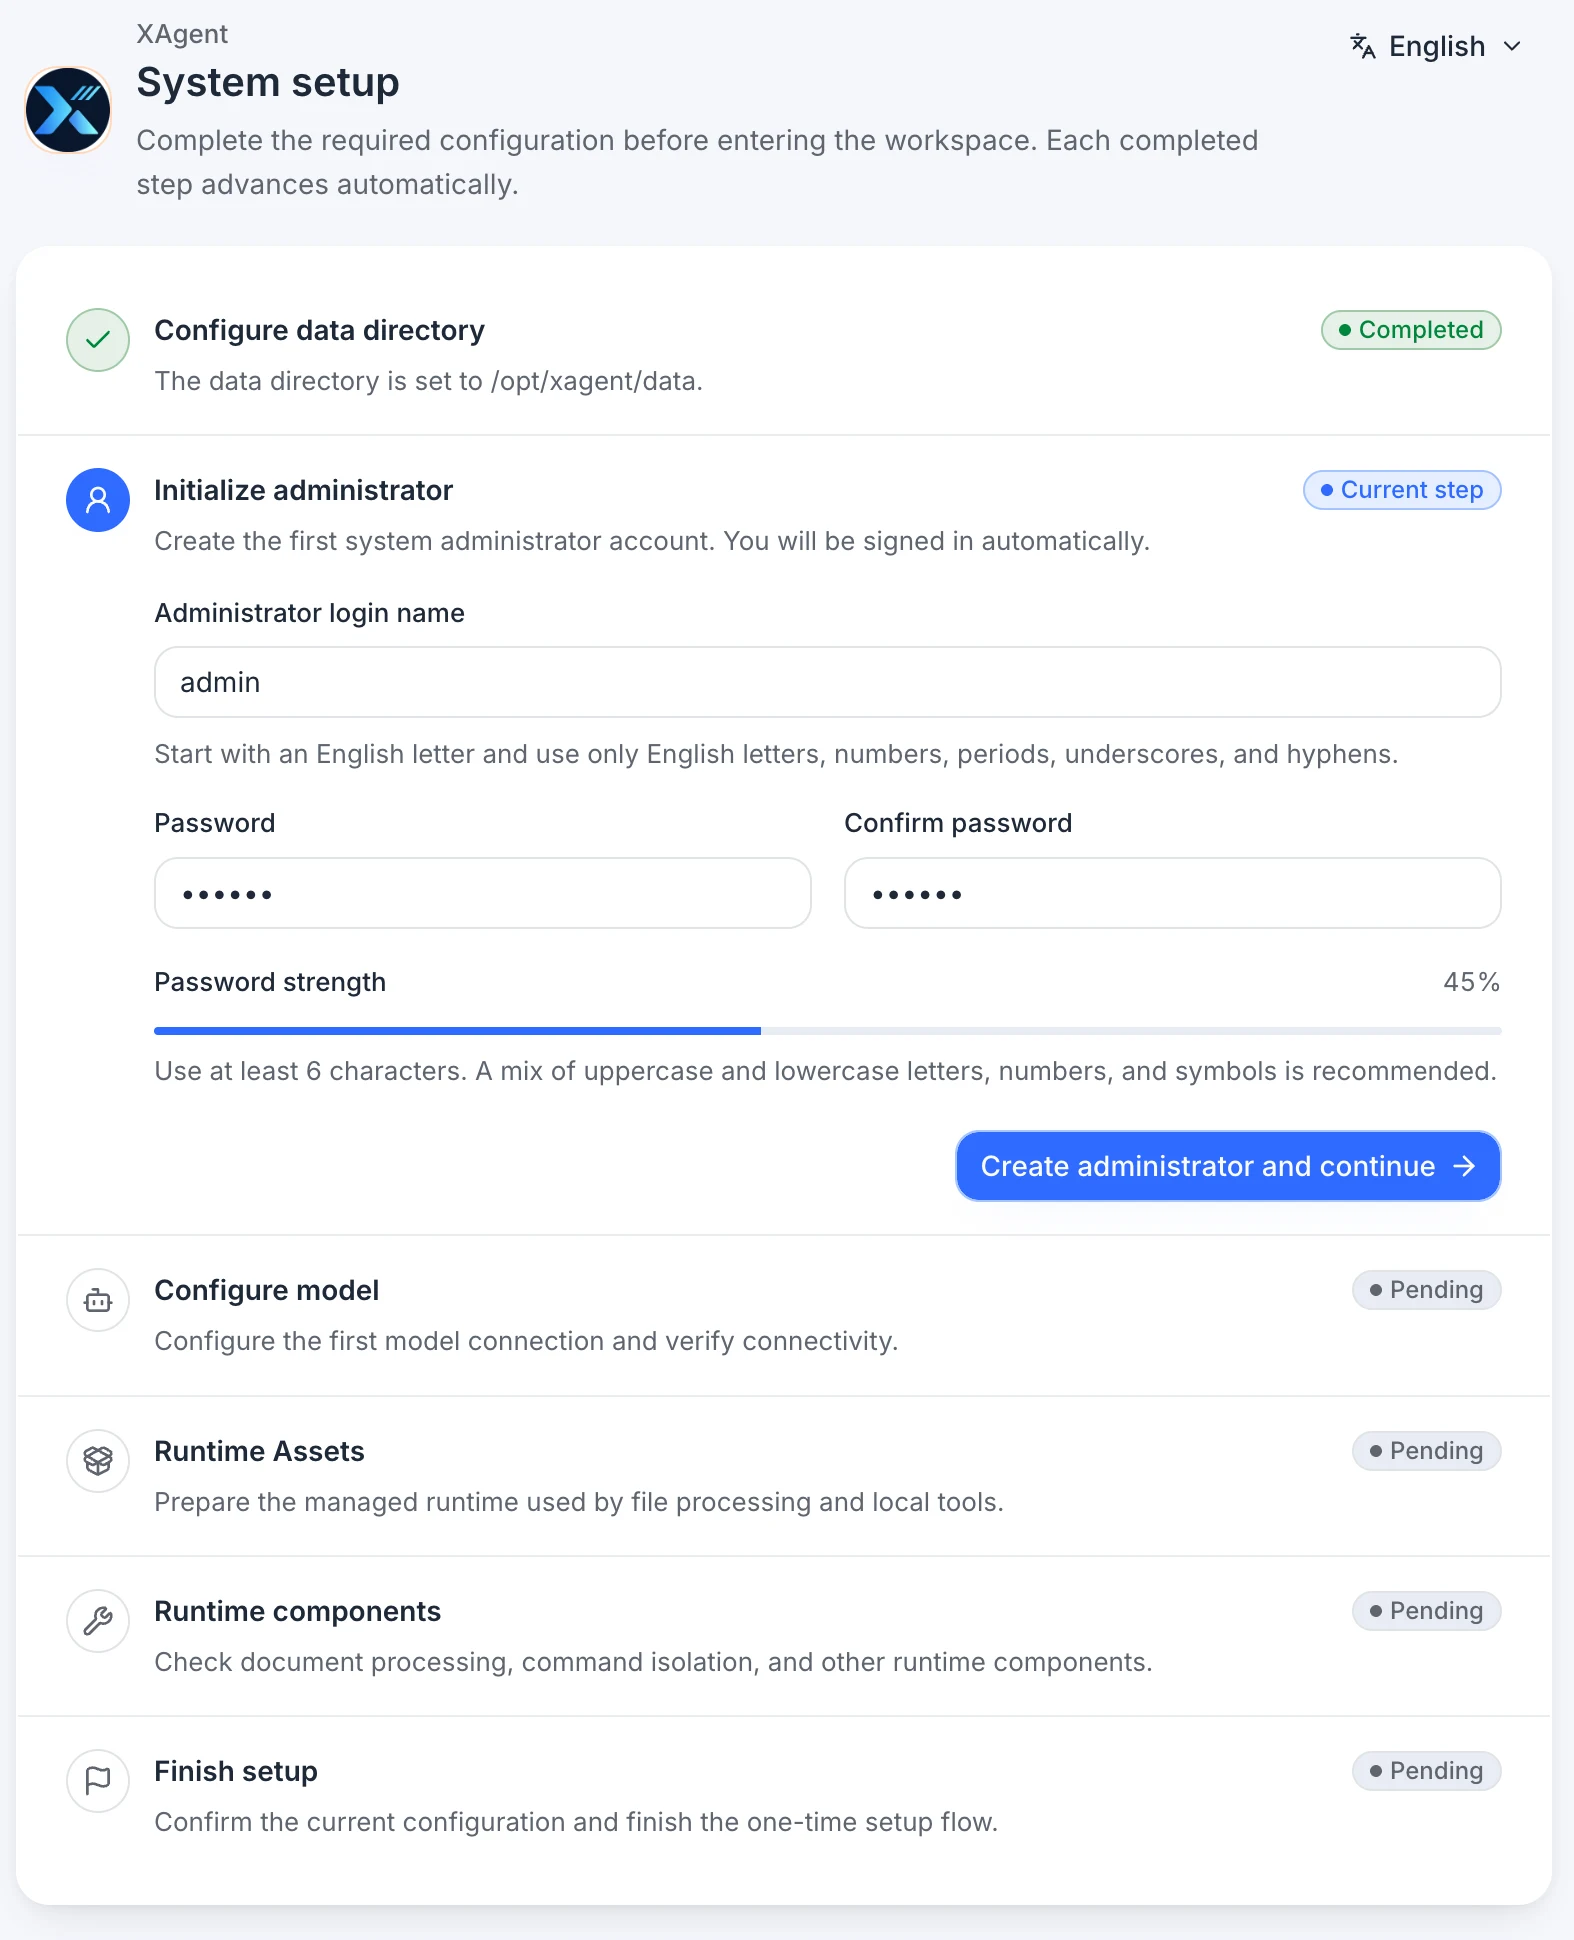
Recommendations:
- Use a dedicated administrator account instead of reusing a normal user password.
- Use a long, unique password and store it in a password manager.
- Never put administrator credentials in sessions, workspace files, or screenshots.
After the account is created, xAgent signs you in automatically and moves to model configuration.
Step 6: Set the Default Model
Enter the default model connection information and select Test and save. The setup flow moves to the next step only after the model connection test passes.
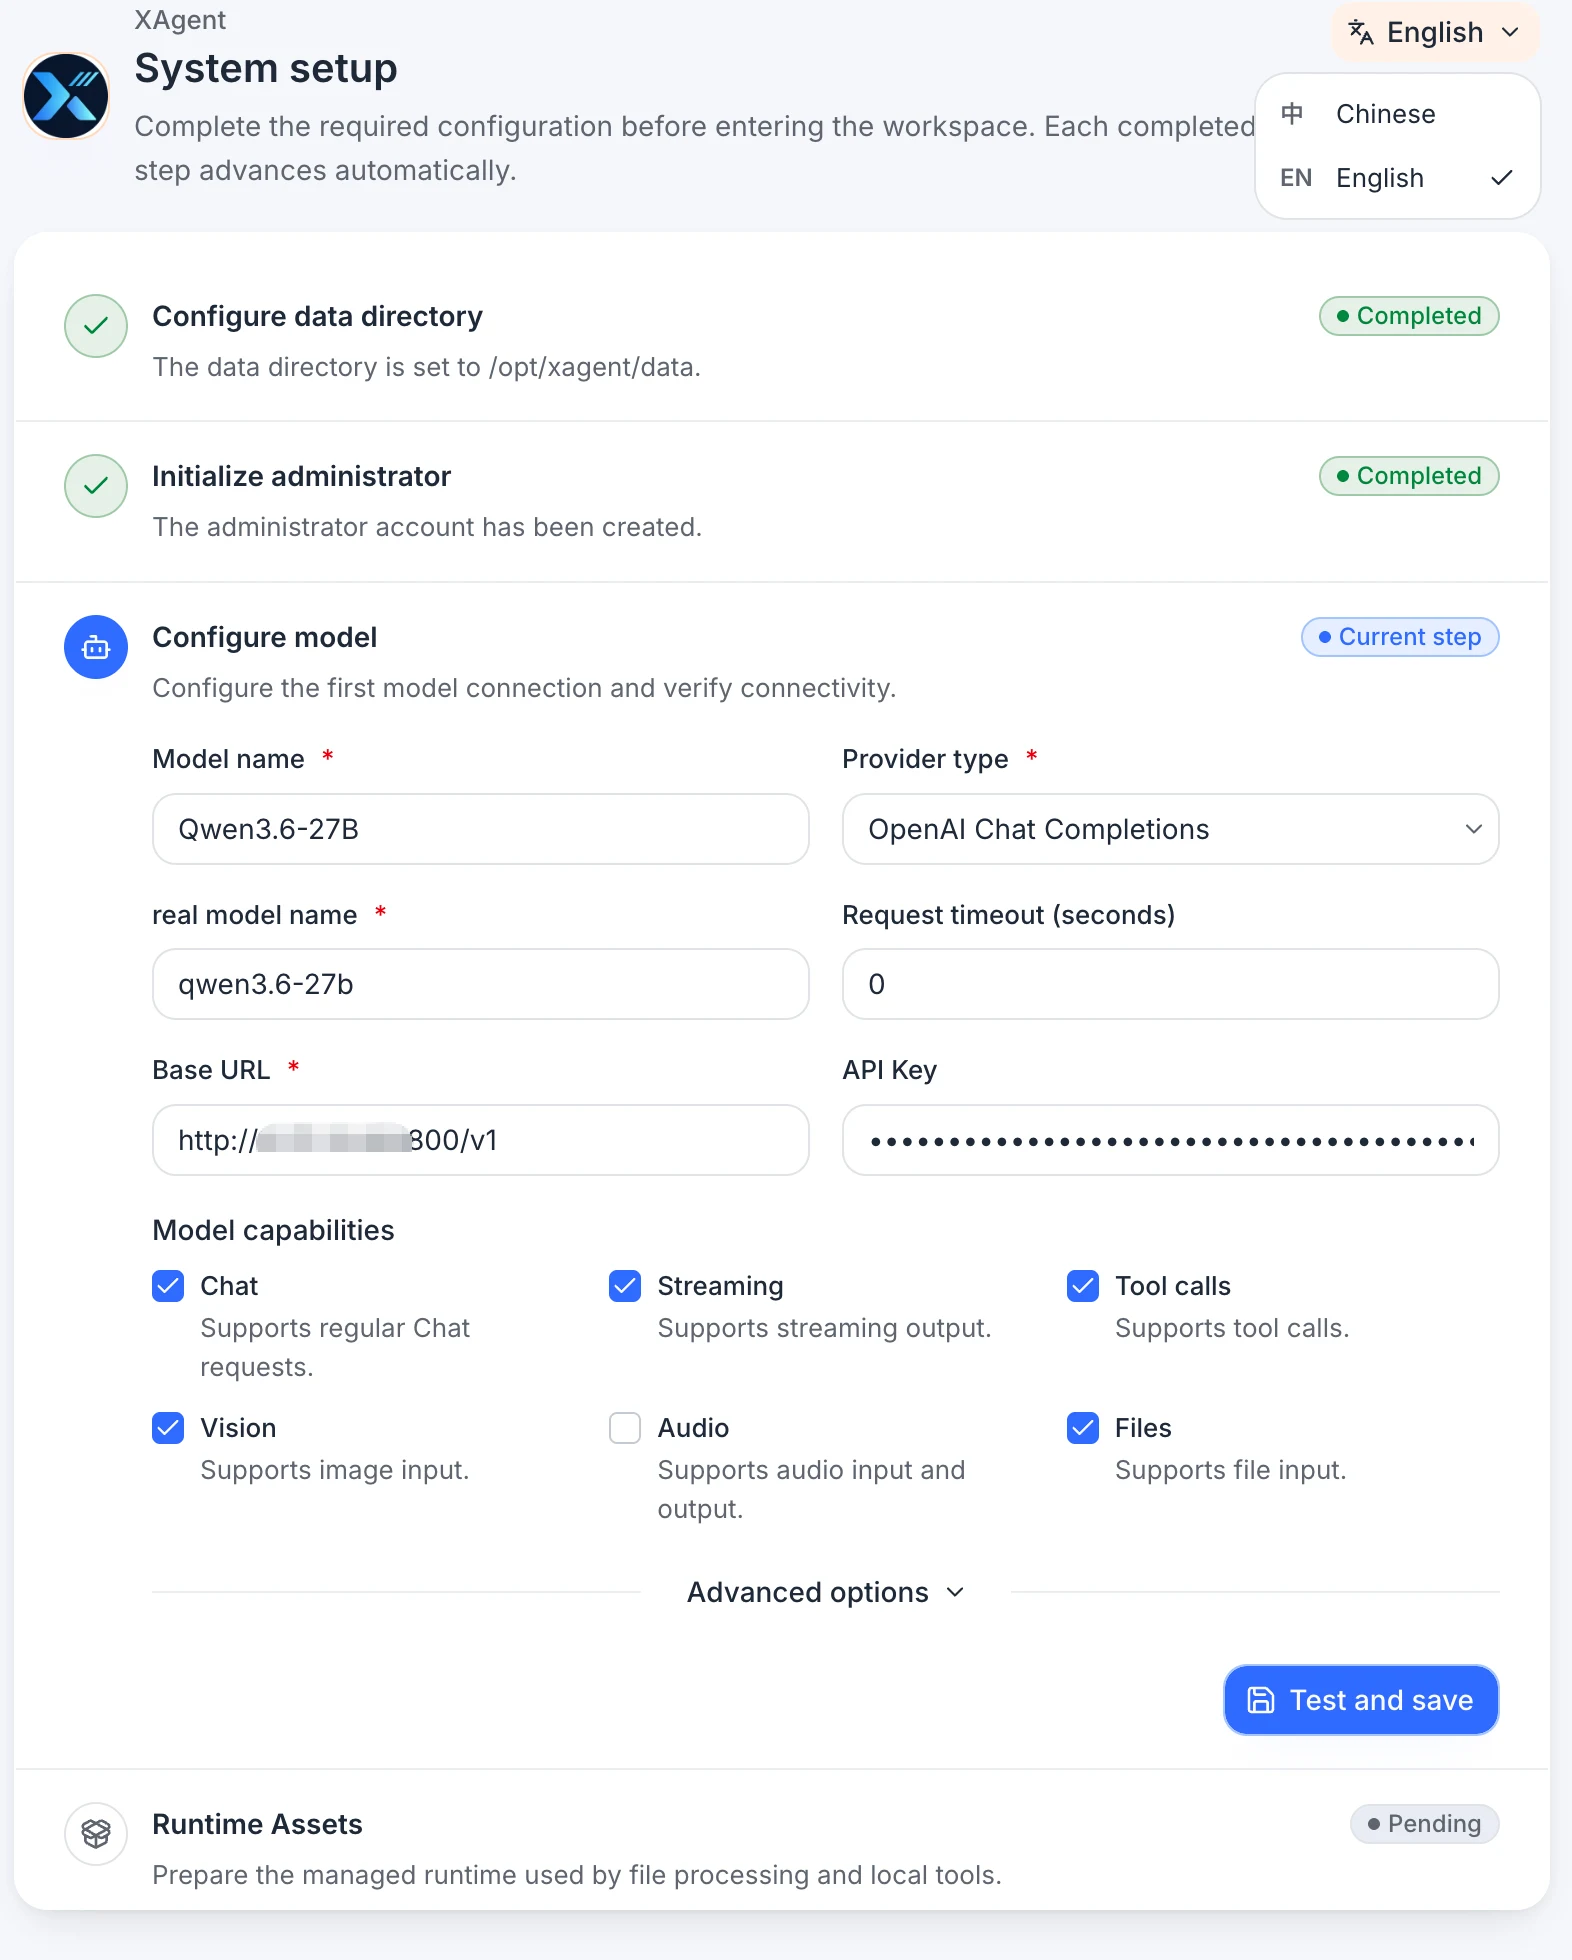
The main fields are:
- Model name: The name shown in xAgent, such as
Qwen3.6-27B. - Provider type: The model service protocol, such as OpenAI Chat Completions.
- Real model name: The actual model ID sent to the model service, such as
qwen3.6-27b. - Base URL: The compatible API address, including a path such as
/v1when required by the service. - API Key: The model service credential. Do not put it in documentation, screenshots, or public logs after saving it.
- Model capabilities: Select chat, tool calls, vision, audio, and files according to actual support. Earlier versions exposed image generation as an OpenAI-compatible capability switch. Current source uses a dedicated image Provider, which cannot be the default chat model; see Model Configuration.
- Advanced options: Configure timeout and other request parameters only when needed.
The connectivity test only proves that the service is reachable. Run a real task afterward to verify tool calls, file processing, and saved outputs. See Model Configuration for field details.
Step 7: Prepare Runtime Assets
Runtime Assets are managed task dependencies used by file processing, local tools, and other controlled execution. xAgent downloads, verifies, and installs these dependencies. Earlier versions display installation in the wizard; current source manages them through execution-environment and runtime-resource controls. You do not need to install Python or Node.js into the host environment by hand.
LibreOffice is an exception: its many operating-system dependencies are not bundled in the xAgent release. For Word, PowerPoint, and Excel PDF conversion or Excel recalculation, administrators must install LibreOffice on the host with the system package manager. On Debian/Ubuntu run sudo apt-get update && sudo apt-get install -y libreoffice, then verify with soffice --headless --version; use the equivalent package manager on other distributions.
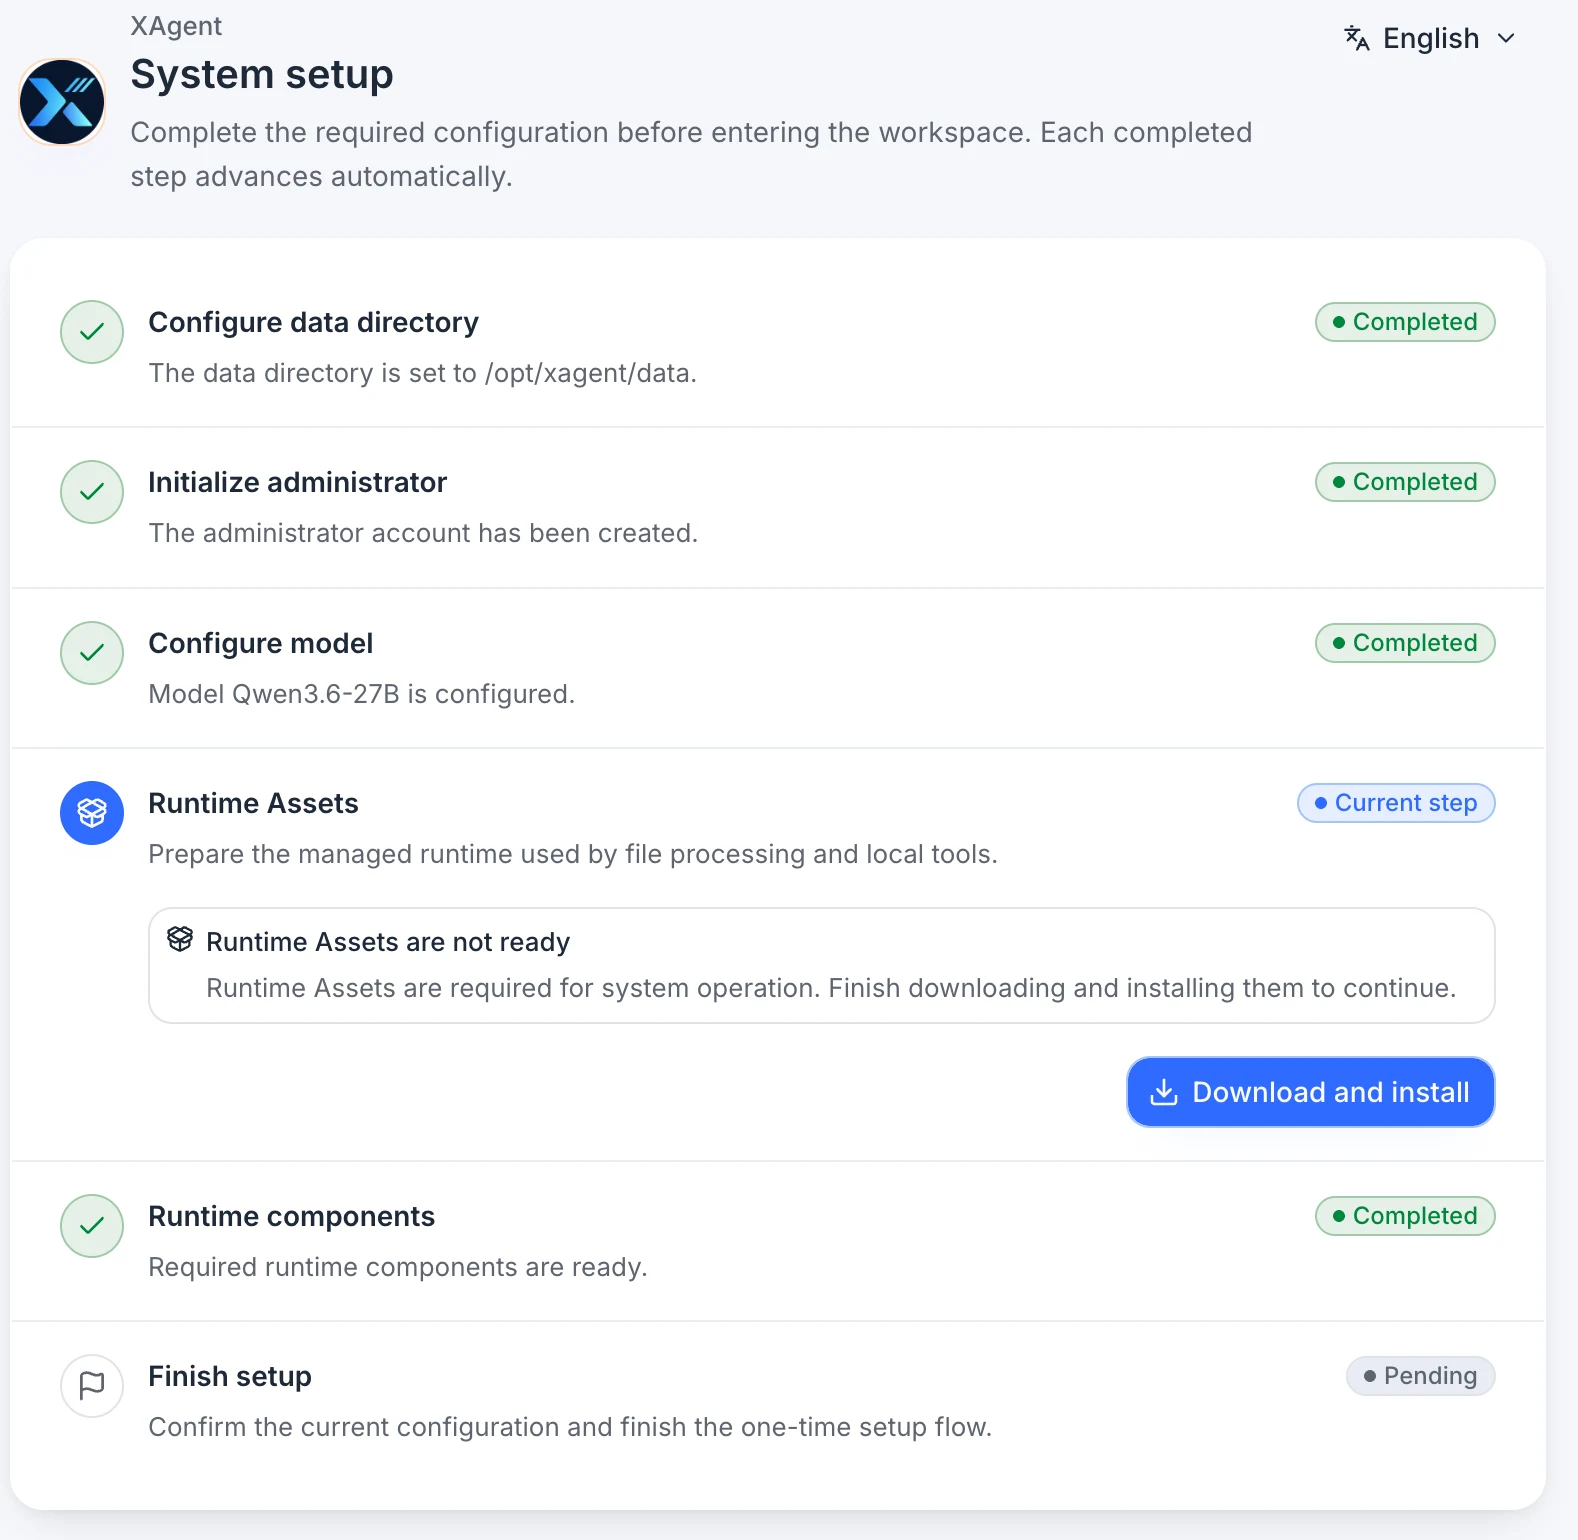
In the earlier wizard, when the page shows that Runtime Assets are not ready, select Download and install. xAgent downloads the matching runtime dependencies from the download site, verifies them, and installs them. The setup flow continues after this step changes to Completed.
Wait for this step to complete before continuing. If the download or installation fails, check the service logs and download connectivity instead of bypassing the setup flow.
Step 8: Check Runtime Components
Runtime components provide document processing, command isolation, and other local execution capabilities. xAgent installs and tests these components automatically. After the test passes, open Agent governance > Execution environment and confirm that Runtime Assets and ProcessSandbox are available.
If the check fails:
- Record the error shown on the page.
- Check the
xagent-serverservice logs. - Confirm that the host can reach the download site and that the kernel supports the sandbox features required by Linux.
- Run the check again after fixing the cause. Do not enable unrestricted host execution as a workaround.
Step 9: Finish Setup
After completing the required wizard items for your version and checking the data directory, database (if shown), administrator, model, and required runtime dependencies, select Finish setup. xAgent enters the workspace, and users can access it through the Web UI or installed AgentPlugins.
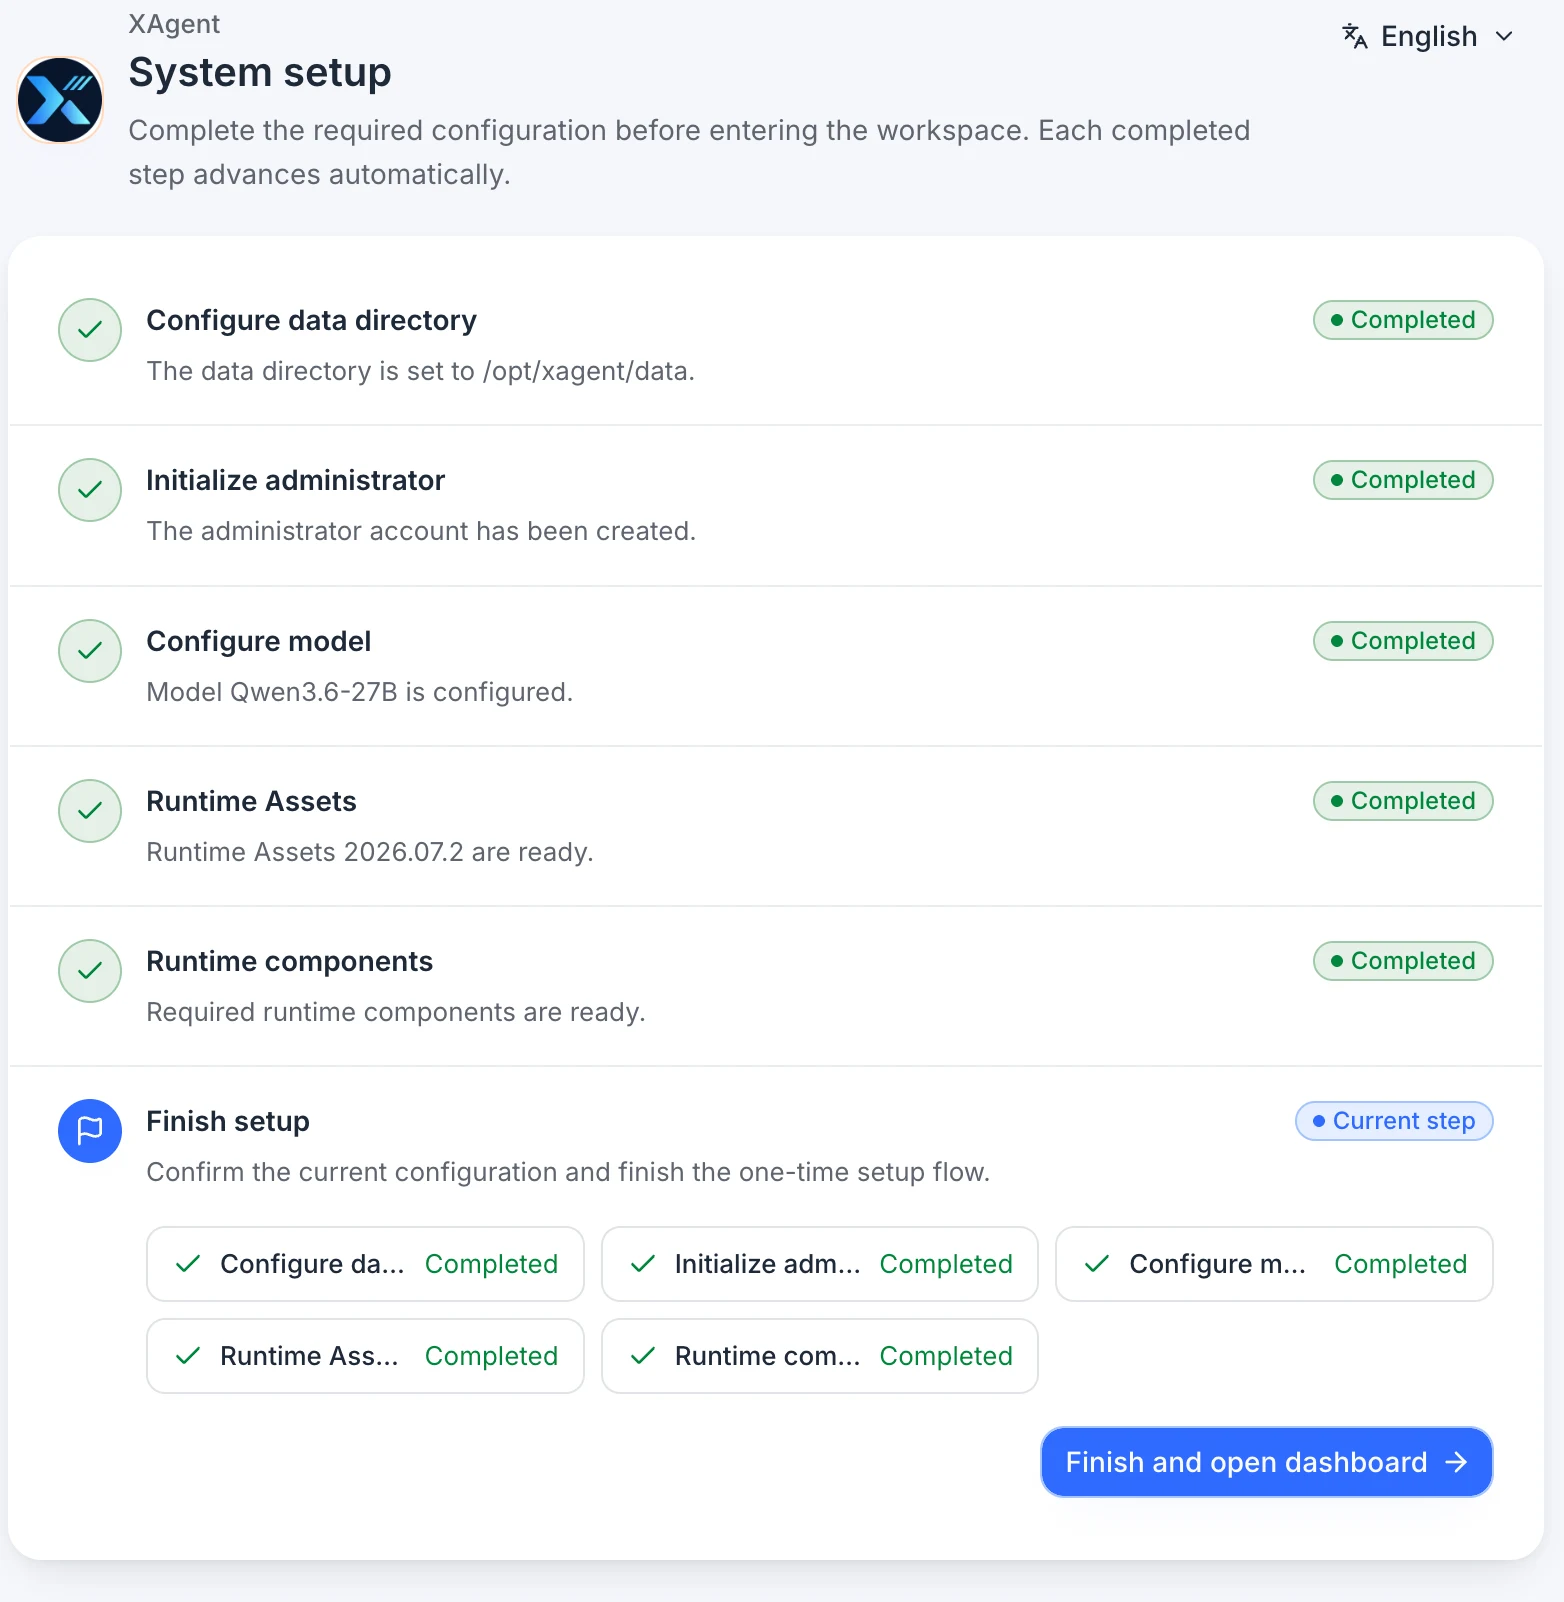
The earlier final step summarizes completed items and uses Finish and open dashboard. Current source summarizes the directory, database, administrator, and model. Use the completion button actually shown by your version.
Run a minimal acceptance check immediately after entering the workspace:
Reply with “installation check passed” and tell me whether this session can call the configured model.
If the model, session, and reply work, upload a small non-sensitive file to verify workspace reading and result saving.
The Dashboard After Setup
After setup is complete, xAgent opens the dashboard. It shows token usage, model and tool call counts, and the current session state. From here, you can continue to Agent sessions, workspace files, and governance settings.
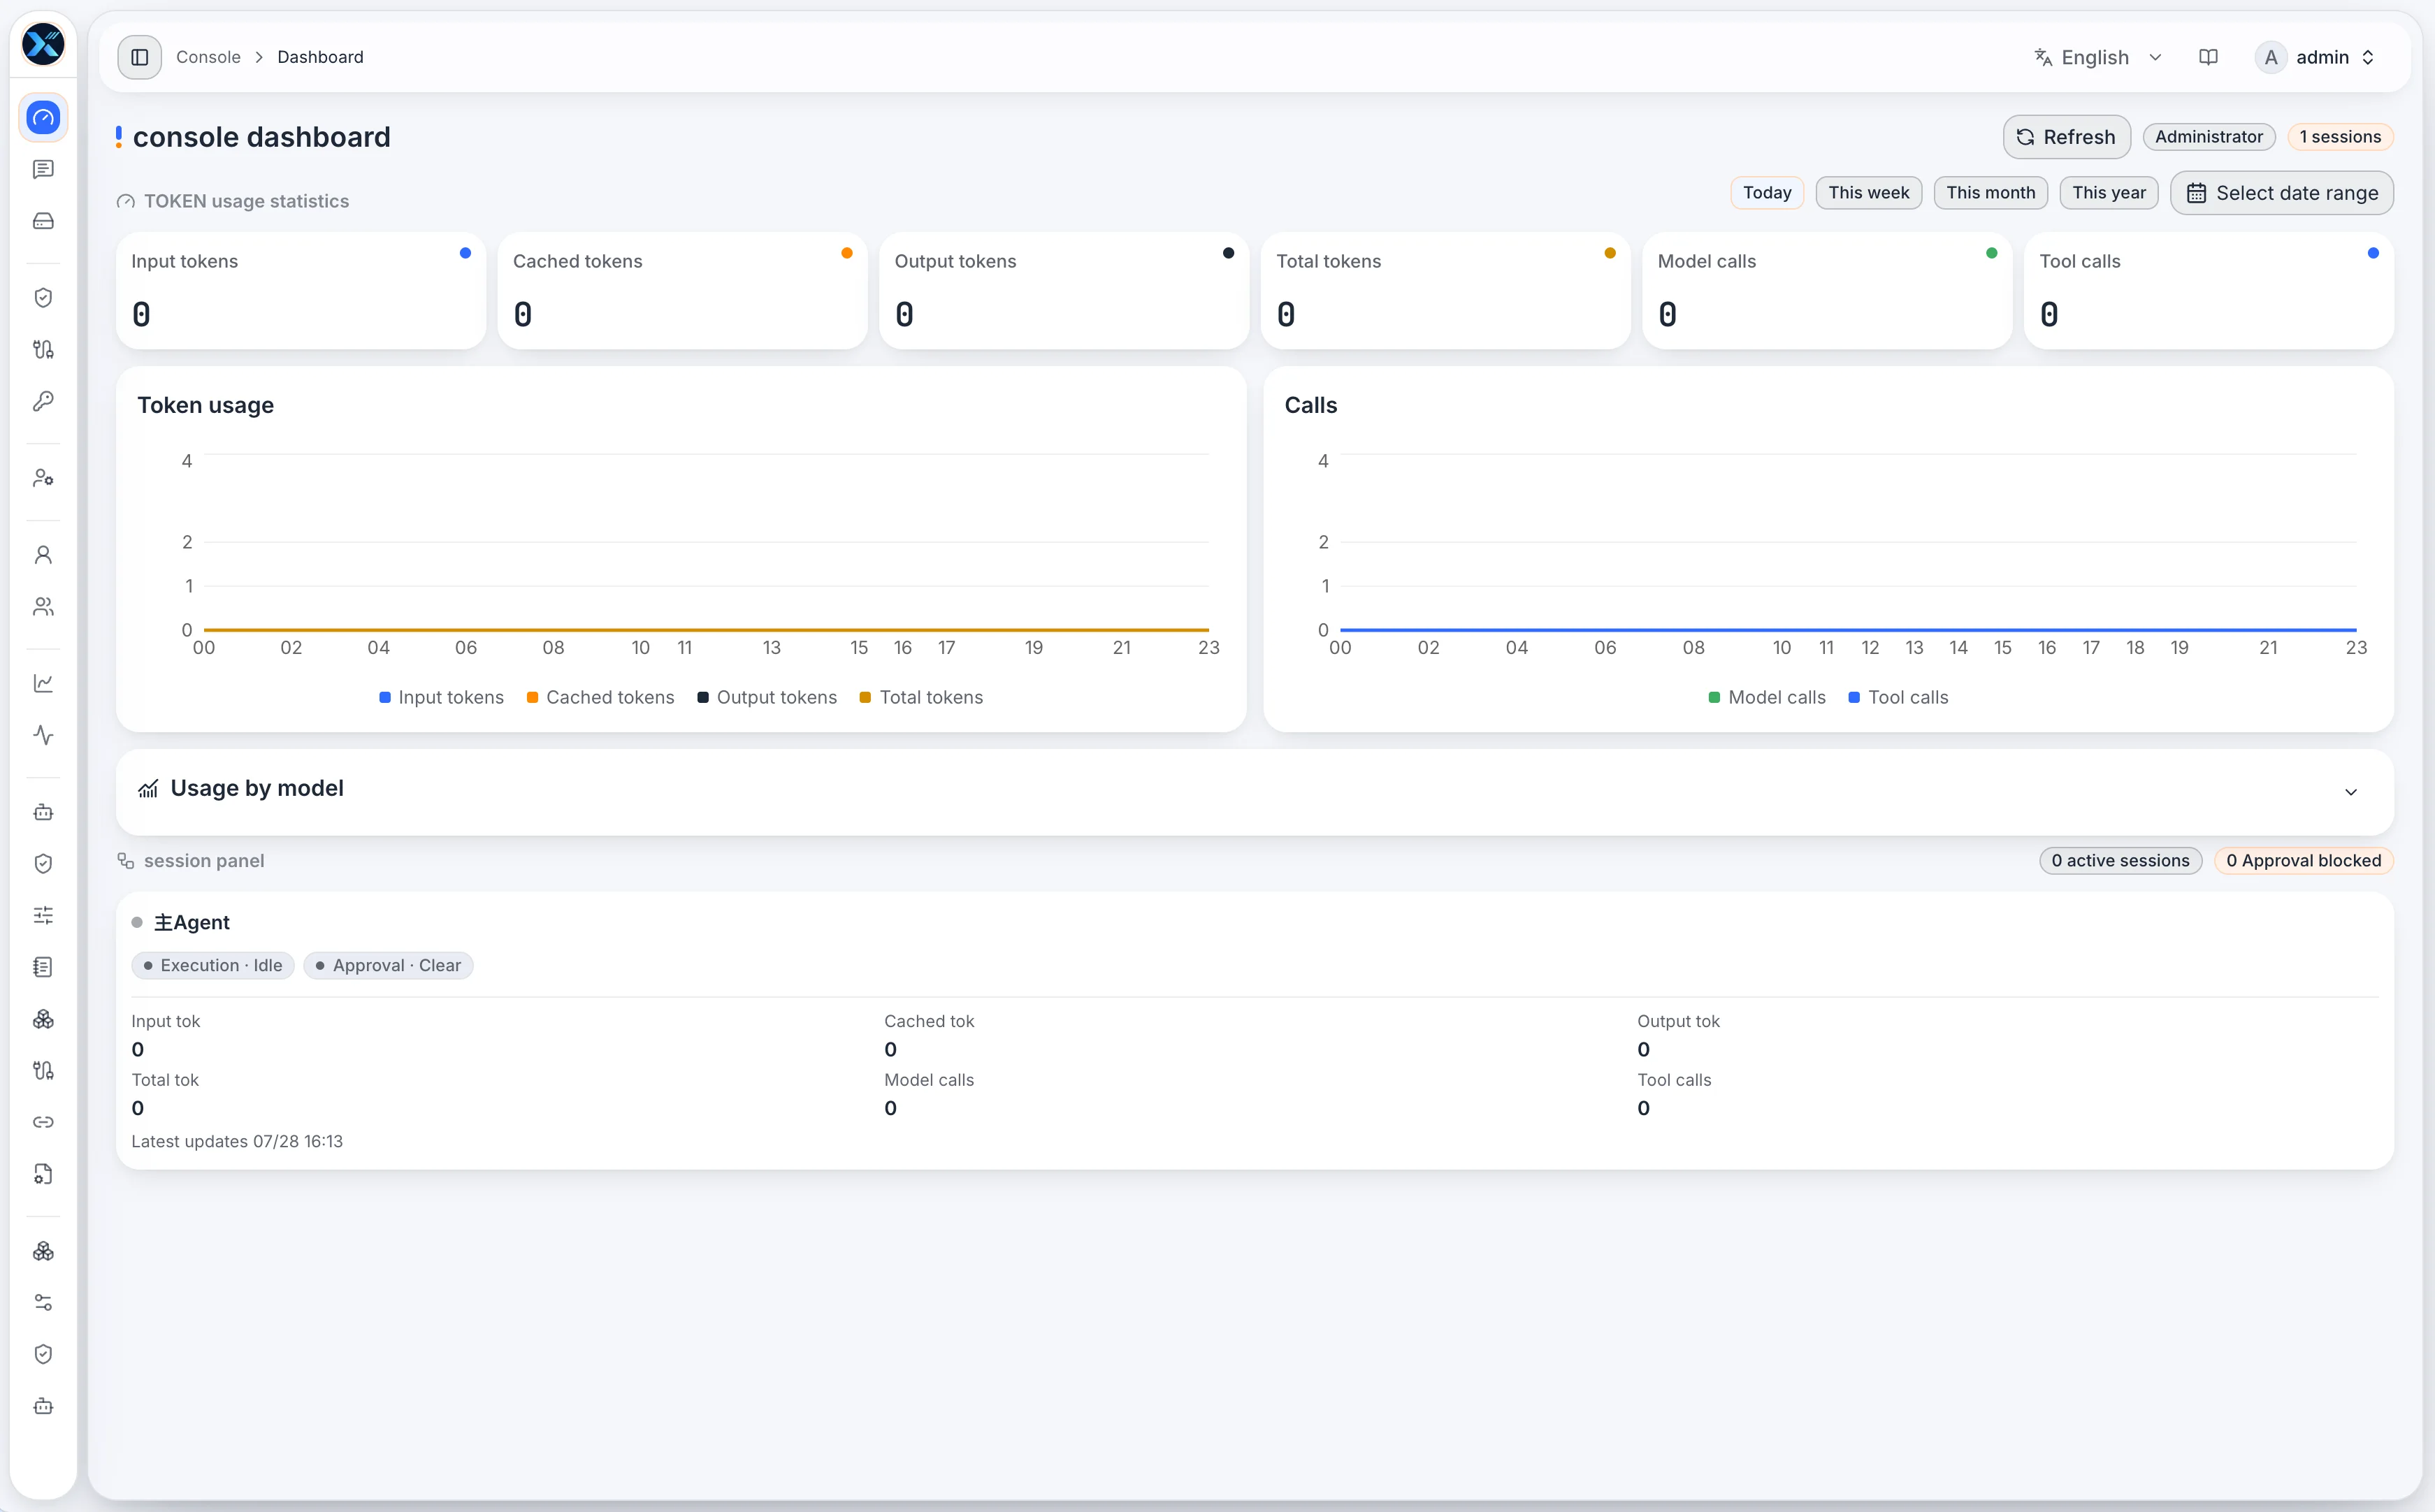
AgentPlugins Are Optional
AgentPlugins are not required for basic Web console access. After installing a plugin, administrators open Agent Governance > AgentPlugin Connectors and enter the installer-provided address and API Key; users bind their accounts or resources in Operations > Plugin Connections. If you skipped installation, follow the AgentPlugin guide later. See Database AgentPlugin and SSH AgentPlugin for those resources.